An iPhone Photographer's Toolkit
August 18, 2025 - 10 min read
Introduction
For a while now, I have been shooting professional level photos on my iPhone 15 Pro, and I have tested many different iPhone photography apps, each claiming to be a better camera than the last. In many cases, these apps rely on advanced AI algorithms to upscale photos, remove reflections, and correct lens distortion, but these features are only trying to fix an already bland-looking image. And even when these features succeed, the picture's limited dynamic range hinders the picture from being shareable, or even viewable.
Luckily, there are ways around this. If you have a newer Pro iPhone, you likely have access to features you didn't even know existed that will allow you to take photos like the ones below.
Element #1 - ProRAW
The first step to taking beautiful iPhone photos that look like they could be shot on a professional camera is to enable the ProRAW option in the default camera app. There's a great tutorial here if you don't know how to do that.
ProRAW is Apple's RAW format, combining the unfiltered data of RAW with enhanced editing cabalities. Compared to the camera default of JPEG, RAW formats are lossless, while JPEG is lossy. (think lossless = no data loss, lossy = much data lost). For a deeper dive into RAW, there's a great guide here.
Element #2 - Editing
Now that you have a good-quality image to work with, you'll need a high-quality editor to dial in your style. I personally would recommend LightRoom Mobile or LIIT, which both have advanced editing capabilities that are simply not available in the default Photos app. I use both apps on a regular basis, and they are both free to use (LightRoom Mobile requires an Adobe subscription to access AI tools, but I've honestly never had a need for those tools).
Element #3 - LUTs
Once you've selected a good image editor, it's time to grab some LUTs! In case you're unfamiliar, LUT stands for Look Up Table. At its core, a LUT is just a spreadsheet of red, green, and blue values on a 0-1 scale. If it helps, you can think of a LUT as filter that can adjust all basic image properties like exposure, saturation, gamma, highlights, and more. For a deeper dive into LUTs, there's a great guide here.
The main LUT that I use is called Cinema Grade Kodak, by LandonBTW. It's free to download on his website, but I've made it available here. The other LUTs included in this pack are great for videos, but they can work on photos as well.
Bonus Element - Fotorgear Camera App
If the default camera app isn't quite doing the trick for you and you want a bit more control, or maybe the ability to preview LUTs in-camera, I highly recommend you check out the Fotorgear app.
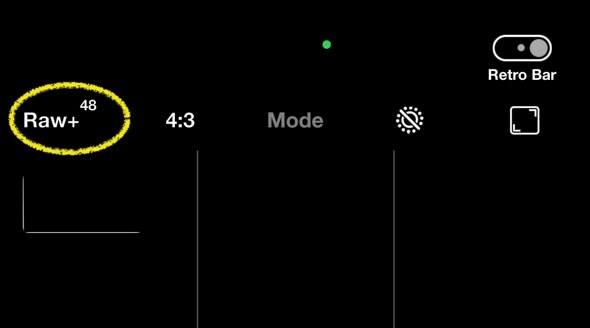
Pro tip: shoot in RAW+ mode (upper left-hand corner). Shooting in RAW+ will save a JPEG of your photo with the current LUT already baked-in, as well as an unedited RAW version for you to play around with later.
Happy shooting!